Thursday 31 August 2017

Healing Tea

I have had the best week. I got to fly to my home town and visit my family. My BFF's little boy (who I have claimed as my nephew) turned 2 years old and we got to celebrate together! Unfortunately I picked up the flu somewhere along the way and have been drinking lots and lots of tea. For those who know me well, know that I love tea. It is not uncommon for me to have 10-15 types of tea in my cupboard at one time. When I am sick though, I like to make my own concoctions up. Today's recipe, is one of those teas. It has peppermint (which is a natural decongestant, fever reducer and can help with nausea), ginger (a natural anti-inflammatory and can help treat nausea), lemon (to reduce phlegm) and honey (which is good for soothing sore throats and suppressing coughing). Here is how I make it!

Healing tea recipe (per cup)

Ingredients

  • 2 tsp of dried peppermint, or loose leaf peppermint tea
  • 2 tsp of organic honey
  • 1 tsp of fresh grated ginger
  • 1 tbsp of fresh lemon juice
  • 250ml boiling water

Method

  1. Place all ingredients into a tea pot and steep for 5 min. 
  2. Strain tea, before drinking.
  3. If using fresh peppermint leave, steep time can be increased to 7min, and peppmint leave can be left in tea for drinking. 


Love Mandym

Thursday 24 August 2017

Sweet Potato Bruschetta Tart

This morning my husband was able to go into work late, so I got up early and made us breakfast to enjoy together before I dropped him off at the train station. This is what I came up with.

Introducing sweet potato bruschetta tart. This recipe was very simple and would be great to make as an entre for a dinner party, or as a light lunch, brunch or breakfast.

Sweet potato Bruschetta tart

Crust

Ingredients
  • 1 cup of cashews
  • 1 cup of tapioca flour
  • 2 Tbsp of dried thyme
  • 50ml olive oil
  • 50ml of cold water
Method
  1. Place all ingredients into the Kitchenaid Cook Processor, and pulse for 15 seconds, scrape down sides and repeat, until ingredients comes together forming your pastry dough.
  2. Using olive oil, grease 6 small, loose bottomed tart pans, or alternatively 8 bottoms of a muffin tray. Press dough into the pans to form your tart crust, ensuring that the thickness is even both on the bases and sides of the pans.
  3.  Bake in oven at 180 degrees Celsius for 10-15 minutes. Let rest for 10 min before removing the tin cases

Filling

Ingredients
  • 1 large roasted sweet potato (can be baked at same time as tart, if cut into small cubes)
  • 1/2 cup pistachio nuts
  • 2 Tbsp of almond feta
  • 3 large tomatoes 
  • 1 bunch of basil
Method
  1. Spread the almond feta evenly over the inside of the tart case in a think layer.
  2. Place pistachios and sweet potato in the cook processor and pulse for 15 seconds. Place this inside the tarts on top of the almond feta layer.
  3. Dice the tomato into small pieces, removing the seeds and soft center (this can be placed in the freezer to add to a stock later).
  4. Finely slice basil and mix with the diced tomato.
  5. Place tomato and basil mixture on top of the sweet potato.
  6. Serve and enjoy!
Have fun cooking and creating!

Love Mandy M

Tuesday 22 August 2017

Gluten free zucchini herbed vegan tart- An Inspiration From George Eats


About a week ago, I came across another foodie blog. Like me, Georgia (the author of George Eats),
has some trouble digesting certain foods. Her passion for cooking and creating shines through on her blog, and her photographs are beautiful! Unfortunately, one of my favourite recipes on her blog, has cheeses in it, which doesn't go down so well for me. I have taken this recipe and used her brilliant flavour combinations and basic look to create a vegan version. Please check out George Eats! I am sure you will enjoy perusing the blog as much as I did.

Gluten free zucchini herbed vegan tart

Crust

Ingredients

  • 1 cup of tapioca flour
  • 1 1/2 cups of almond meal
  • 1 tsp dried tarragon
  • 60ml of olive oil
  • 60ml of cold water
  • 1 Tbsp almond feta
Method

  1. Place all ingredients into the Kitchenaid Cook Processor, and pulse for 15 seconds, scrape down sides and repeat, until ingredients comes together forming your pastry dough.
  2. Using olive oil, grease a 20cm round, 3cm deep fluted, loose bottomed pan. Press dough into pan to form your tart crust, ensuring that the thickness is even both on the base and sides of the pan.
  3. Poke holes in crust with fork, and place baking paper on top of pastry with uncooked rice or ceramic weights to blind bake your pastry. Bake in oven at 180 degrees Celsius for 15 minutes.
  4. Remove from oven and allow to cool for at least 1 hour.

Filling

Ingredients

  • 1 cup of chickpea flour
  • 2 1/2 cups of water
  • 2 tsp cook pro stock paste
  • 20g capers
  • 1 cup of mint leaves
  • 1/2 of fresh dill
  • 1/2 fresh chilli
  • salt and pepper to taste
  • 1 tsp of nutmeg
  • 3 Tbsp of nutritional yeast
  • 2-3 zucchinis 
Method
  1. In a bowl, add the chickpea flour and 1 cup of water. Whisk this together and set aside.
  2. In a fry pan, add the rest of the water with the stock paste and capers, and bring to a boil. 
  3. Slowly add the chickpea mixture to the boiling water, a little bit at a time, while continually whisking.
  4. Once all the chickpea mixture has been added, the filling should be thickened. Add the rest of the ingredients and stir well.
  5. Place filling into the tart crust, making sure there are no air bubbles by using a spatula to push the filling down and smooth the surface.
  6. Using a mandolin, or vegetable peeler, slice the outermost parts of the zucchini in long thin strips, length ways (try to avoid using the center of the zucchini with the seeds, these centers can be used to make stock later on so they wont go to waste). Then using a knife cut these into 2 long strips so that each has green skin on one side.
  7. Take one zucchini ribbon and make it into a tight curl and place this in the center of your tart with the green skin part facing upwards. Continue to wrap the zucchini around this center until the top of the tart is covered. George eats has some great photos of this!  
  8. Bake tart in oven for 20 minutes at 180 degrees Celsius.
  9.  Serve with salad and potato wedges or just by itself. 
  10. Enjoy!


Love MandyM

Monday 21 August 2017

Lets talk about some salty balls!

Hi everyone! I hope you all got to make some delicious almond feta. Please send me photos if you have, so I can include them on my posts, or feel free to join my Facebook page and post them there yourself. 

First up let me talk to you about stock. We use stock in a lot of recipes with out really thinking about what goes in it. It makes your dish tasty and is relatively cheap so who cares right? As long as its super easy to get the flavour into the dish. What most people don't do, is read the ingredients list. The first ingredient is usually salt. Don't get me wrong you need salt in stock, but not the amount that goes into the prepackaged ones. Sometimes stocks (especially your stock cubes and powders)  also have fillers, i.e. stuff that is put into it, just to make it bulky so you think you are buying more for your buck (rice flour, corn starch etc). Some even contain sugars, which is something that I need to avoid in my diet.


Since getting my Kitchenaid Cook Processor, making my own stock has been so easy. I don't follow a recipe, I simply keep all of my vegetable scraps in a plastic bag in the freezer and at the end of the week, before shopping day, I take any veges and herbs out of the fridge that look a bit past it. I throw them all in the cook processor with the vege scraps from the freezer and add a tablespoon of salt per approx. 1.5 cup of veges. I pulse the mixture until it all combines and becomes a paste. I then put it in the freezer for future use. I know exactly what has gone into it, and it always gives way more flavour then your store bought varieties. Because of the salt content, your stock paste will not freeze, and so you can easily scoop some out of the container when you need it. In all of the recipes I post, I will refer to this paste as "cook pro stock paste".

Now for today's adventure, let me introduce you to a meat ball alternative...

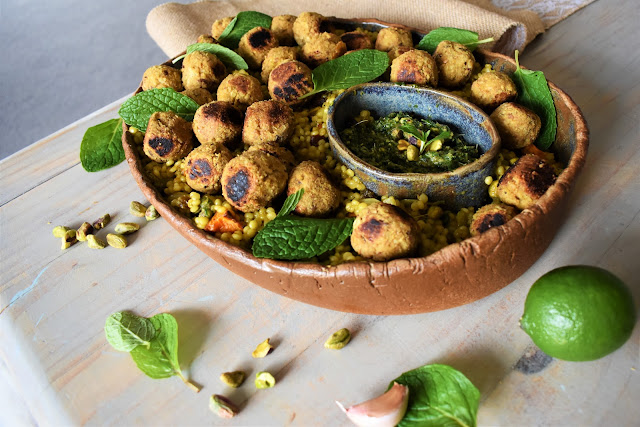
Moroccan Vege balls with couscous

This dish is made in 3 parts, the balls, the couscous and a dip accompaniment.

Couscous

Ingredients
  • 2 cups of diced sweet potatoes
  • 1 onion, halved and sliced thinly
  • 1 Tbsp Meal inspirations Moroccan blend from chefs tool box
  • 2 Tbsp olive oil
  • 300g pearl couscous
  • 2 cups of water
  • 1 cup orange juice
  • 1 Tbsp cook pro stock paste
  • 1 Tbsp honey or for vegan alternative maple syrup
  • 1/2 cup pistachio nuts
  • 3/4 cup mint leaves
  • 1/2 cup sultanas

Method
  1. Using half the olive oil, coat sweet potatoes and bake at 200 degrees Celsius for 15-20 or until golden. Set aside.
  2. Heat a fry pan to medium. Add onion, spice mix, and remaining oil. Heat until fragrant whilst stirring.
  3. Add pearl couscous, and stir through spices for approximately 1-2mins.
  4. Add water, orange juice, stock paste and honey. cook for 10-15min until most of the liquid has been absorbed.
  5. Add pistachio nuts, mint leaves, sultanas, and roasted sweet potatoes. Toss through couscous. Now it is ready to serve!

Vegeballs

Ingredients
  • 1/2 cup Bulgur
  • 2 Tbsp of olive oil
  • 1 clove of garlic
  • 1 onion
  • 1 tsp of Meal inspirations Moroccan blend from chefs tool box
  • 1 can of chickpeas
  • 1/2 cup walnuts
  • 1/2 cup rolled oats
  • 1/4 sunflower seed kernels
  • 1 Tbsp of linseed
  • 3 Tbsp of almond feta
  • 1 Tbsp savory yeast flakes

Method
  1. Soak Bulgur in boiling water for 15min, set aside.
  2. Place half of oil, garlic, onion and spice mix into cook pro with multi-blade. Pulse for 15 seconds.
  3. Replace multi-blade with stir assist, and cook for 5 min, speed one, temp 90 degrees Celsius.
  4. insert multi-blade and all other ingredients. Pulse for 15 seconds, scrape down sides and repeat until mixture becomes sticky and starts to come together in cook pro.
  5. Roll mixture into balls (approx 30-35 balls)
  6. Heat a fry pan to medium-high heat, place in rest of oil and cook balls on each side until golden. Turn the balls carefully with a pair on tongs so they do not fall apart.

Special Moroccan dip

Ingredients
  • 1/2 cup of coriander leaves
  • 1/2 cup of mint leaves
  • 1/4 tsp of ground cumin
  • 2x2cm of fresh ginger (peeled)
  • juice of 1 lime and its zest
  • 1/4 cup olive oil
  • 2Tbsp of honey (or maple syrup)
  • salt to taste
  • the green leaf of 1 scallion (often called shallots in Aus)
  • 1/4 cup of pistachio nuts.
Method
  1. Place all ingredients in mini bowl with mini-blade and pulse of 10seconds. Scrape down sides and repeat x 4 (50 seconds in total).

Serve vege balls on a bed of couscous with dip as a side, or on top of the dish as a garnish.


Happy cooking!

Love Mandy M
  

Sunday 20 August 2017

Al-mmmm-odd feta (AKA Almond feta)

I hope everyone had a fabulous weekend! I spent this weekend playing around with Jackfruit. On my first attempt I failed miserably, or as Nathan kindly put it, "it's edible".  I don't want edible, I want delicious and so this will be my new food stuff to conquer! Jackfruit is really high in protein and vitamin B (which alot of people are deficient in) as well as having a lot of vitamin C. It is also low in fat and can be used as a pulled meat alternative! So back to the shops I will go, on an adventure to obtain more of this marvelous fruit until I perfect my recipe. So rather then sharing a Jackfruit recipe with you today, I will give you my almond feta recipe, that will be used in tomorrow's recipe "Vegan Morrocan vege balls with Couscous".

Almond feta is a great staple food to keep in your fridge! It tastes delicious  and though rather odd, can replace normal smooth feta and ricotta in any normal recipe. It can also be a butter alternative on a salad sandwich or is great just on a piece of toast with some fresh tomato or avocado for breakfast or on crackers for a snack. I also use it to add flavour to a lot of my recipes, so it is a good thing to keep around.


Almond Feta

Ingredients
  • 1 1/3 cup of soaked almonds (whole, no need to take skins off)
  • 4Tbsp of lemon juice
  • 3 1/2 Tbsp of olive oil
  • 2 roasted cloves of garlic (you don't have to roast these, you can use raw, but the final product has more flavour if they are roasted first)
  • 1 tsp of finely ground salt
  • 3 1/2 tbsp of filtered water
Method
  1. Place all ingredients into the small Cook processor bowl with mini-blade. Pulse for 20 seconds, scrape down sides and repeat until the ingredients start to become sticky enough to form a ball.
  2. Place in fridge for at least 5 hours before consuming, or overnight.

As always, the cook processor is not needed if you have a good food processor. It is just what I use, because I think it is fabulous!

Back to the kitchen for me! Signing off,

Love Mandy M

Thursday 17 August 2017

Life-saving Almond Milk

Good morning everyone!
Last night was a rough night for me. Hypothyroidism slows the metabolism, which usually makes you really tired along with a bunch of other symptoms that varies from person to person. Some people though despite being exhausted also get insomnia. I am one of the lucky ones and only get this every now and then. Last night was a sleep fight night, despite my best efforts (I am very competitive) I think hypo won 9 hours of laying very still to 3 hours of actual sleep.

I am very thankful for my pre-homemade almond milk though, which was sitting in the fridge calling my name from 4am this morning. I resisted temptation and have waited til now to get out of the bed and make some delicious life-saving coffee. Although I'm not sure if waiting this long was out of pure stubbornness to at least try to get 6 hours of sleep. For those who know me, know quite well of my stubbornness. I could win a competition of "what is the most stubborn?" versus most things... that wine stain on your favourite rug, the calcium residue on the glass pane in your shower, your cat meowing in the early hours of the morning for food or you dogs insistence when they hear the word "walk". I could beat all of those and still have some stubbornness left over.

Today I will share my recipe for this life saving almond milk with you all. It is so simple and yet so delicious and has none of the chemically after taste that the store bought ones do. After making this for the first time I declared to my husband that I would never drink store bought again! And so far I have kept that promise. I hope you enjoy it as much as I do.


Almond Milk

Ingredients
·         2 cups almonds
·         pinch salt + water to cover
·         4 cups filtered water
·         2 dates, pitted

Method

1.    Add salt to almonds and dates and cover with water.
2.    Soak 8-12 hours or overnight at room temperature.
3.    Drain almonds and rinse.
4.    Take off almond skin by rubbing it between 2 fingers. (should come out pretty easy, careful with how hard you rub though, otherwise your almond may fly across the room! And if your house is anything like my house, it will be a race between you and the dogs as to who gets to it first!)
5.    Add almonds to KitchenAid cook processor with 3 cups of filtered water and dates.
6.    Blend until smooth, using pulse for 20 seconds, scrape down sides if needed and pulse again.
7.    Line a bowl with cheese cloth/nut bag. Pour off most of liquid in bowl.
8.    Leave what is left in the CookPro, add another cup of filtered water and pulse again for 20 seconds.
9.    Strain through nut milk bag, squeezing pulp thoroughly to extract as much almond milk as possible.
10. Store in the fridge for up to 4 days.
11. The left over almonds from the bag can be made into almond meal by placing on a baking tray in an oven pre-heated to 120 degrees Celsius for 15-20 min. Make sure the meal is spread in a thin layer and is left on the bench to coll for at least 1 hour or more before storing in an airtight container.
Thank you all for visiting, and I hope to see you again. Feel free to leave me a comment below, and please let me know if you try the recipe. If you do not have a cook pro, don't fear! A good processor or blender should work out fine, you might just need to pulse for longer or play around with the speeds a little.
Signing off!
Love Mandy M xo

Wednesday 16 August 2017

My first Post

Hi Everyone! And welcome to My Blog. This being my very first post, I am feeling like I have no idea what to type. The first few sentences were typed, re-written, edited and then deleted quite a few times before I decided I should just type! I have decided to begin a blog in the hopes to share some of my creations and life stories with friends and those who might become friends and those people who I may never meet but have similar passions or are just looking for some inspiration. Most importantly I would like everyone who visits to feel as though they are part of my blogging family.

I have always loved cooking. Growing up, my Great-Grandmother lived in an attached Granny flat at the back of our house and some of my earliest and fondest memories are of times spent with her, my mother and two older sisters cooking up a storm! Nita (my Great-Grandmother) was one of a kind. She had a passion for food and family and has passed that on to my Mother, my sisters and myself. As a child I had an overwhelming awe of both my mother and Great-Grandmother and how they were able to turn simple ingredients into works of art that not only looked too good to eat but were nevertheless irresistible and subsequently ended up in my tummy. When I was little I played a vital part in the cooking process. Manager, taste inspector and primary cleaner. I did little of the actual cooking but most certainly enjoyed dancing around the kitchen telling them what colour the icing should be, while licking the cake batter off the spoon and making sure the bowl was as clean as clean could be by using my fingers, tongue and sometimes nose to make sure I had made the bowl shine once again. But of course, everything always tastes better when you share (thanks to my mum for this great life lesson)! So this meant letting my sisters help with the position of primary cleaner.

This love of cooking had always stayed with me and always will. However, life is much different than what it use to be. A couple of years ago after progressively getting sicker and sicker for 6 years, I was diagnosed with hypothyroidism. This has meant that I have been fighting with food, and it has been fighting with me for many years. It is very hard to describe how something like hypothyroidism can affect your life unless you yourself have had the same experience. In future posts I hope I can at least give people some insight and create a safe space for those that always have "food fights" to learn and share new ways of cooking and enjoying food. These days my diet tends to be mainly vegan based (my body does not seem to like many animals products), or what I like to call it "veganfor5". I usually avoid animal products for the majority of the week and for 2 nights a week, I will give myself a break, and either go out and enjoy a really good meaty meal or make make something at home. Because of this most of the recipes I share will be vegan/vegetarian based. They are also usually free from processed foods, low in sugar and full of fresh tasty produce.

My love of creating is not only limited to cooking (although at this point is probably what I will be sharing the most), I love anything where I can bring something new into the world that can be enjoyed by many. Food, painting, drawing, yarn spinning, knitting, crochet and photography just to name a few and hope that this will be a place I can share everything I can have created so that more people can hopefully enjoy my art and find inspiration for their own creations.

I feel like now that I have started typing, I could type all day and still have more to say, but for now I am signing off and will put some time aside for tomorrow to work once again on my blog. Signing off!
Love Mandy M
A photo of my Great-Grandmother and Great-GrandFather (well before my time on this earth)